iJIG
Our patented iJIG system (Patent no. 11589963) combines fit verification and final prosthetic proposal into a single device that transforms your full arch digital workflow from multiple complex appointments into a streamlined process.
Using your existing digital scanner and our specialized scan analogs, we fabricate a sectioned duplicate of your patient's prosthesis that allows you to verify passive fit, lute sections together intraorally, and capture all necessary records—including implant positions, tissue contours, vertical dimension, and occlusion—in just one appointment.
Compatible with all major implant systems, the iJIG eliminates traditional bite blocks and multiple try-ins while giving you the flexibility to go directly to final zirconia or through an optional printed try-in stage.
This innovative approach reduces your full arch cases to as few as three appointments, delivering predictable, passive-fitting results while enhancing both patient comfort and practice efficiency.


Clinical Benefits of the iJIG System
Streamlined Appointment Schedule:
- Reduces full arch cases to as few as 3 appointments
- Can skip the printed try-in stage and go directly to the final restoration
Comprehensive Single-Appointment Record Capture:
- Captures implant positions, tissue contours, vertical dimension, and occlusion simultaneously
- Eliminates the need for traditional bite blocks, bite rims, and multiple impression procedures
Enhanced Accuracy and Verification:
- Sectioned design allows passive fit verification before final commitment
- Digital duplication maintains proven vertical dimension from the patient's existing prosthesis
Universal Compatibility:
- Works with existing digital impression scanners (no additional equipment required)
- Compatible with all major implant systems
Functional Patient Testing:
- Provides a working prototype for patient test-drive and approval before final fabrication
- Allows intraoral luting, equilibration, and immediate functional assessment
iJIG Implant System Compatibility
The iJIG system is compatible with most major implant platforms; however, certain systems require original equipment manufacturer (OEM) parts for both scanning and fabrication.
Standard iJIG Compatible Systems:
- Works directly with Nobel, BioHorizon, NeoDent, Biomet 3i, Hiossen, Thommen, Keystone, and other Nobel-compatible multi-unit abutments
- Uses standard 3rd-party scan analogs and fabrication components
OEM Parts Required Systems:
- Zimmer, Implant Direct, Camlog, Astra, MIS, Straumann, and Paltop require original equipment manufacturer (OEM) MUA replicas for scanning
- Screw OEM replicas into prosthetic and scan according to standard protocols
- OEM parts are also required for iJIG fabrication, resulting in a higher cost than standard Nobel-compatible cases
Important Notes:
- Specify the exact implant system when ordering - critical for proper analog selection
- For mixed implant cases, identify which implant is at each position
- Contact ROE with questions about specific implant compatibility or cost differences
Download Your Free Ultimate Restorative Protocol Guide Now
What You'll Gain In This 70-Page Guide:
- Step-by-step instructions for ten digital and analog restorative protocols
- Complete understanding of all necessary patient record requirements on a per-patient scenario
- Detailed comparison charts for informed decision-making between protocols
Available in digital or print format (free mailing included).

iJIG: Frequently Asked Questions
Frequently Asked Questions
Have question? We are here to help

No results found.
- A patented device (Patent no. 11589963) that combines fit verification and final prosthetic proposal into one appliance
- Allows digital transfer of full arch records through your existing intraoral scanner
- Serves as both a comprehensive record-gathering device and a functional prototype
- Eliminates the need for traditional bite blocks, multiple try-in appointments, and complex impression procedures
- Captures implant positions, tissue contours, vertical dimension, and occlusion simultaneously in one appointment
- Reduces full arch cases to as few as 3 appointments
- Any digital impression scanner (compatible with most IOS systems)
- ROE's specialized iJIG scan analogs (must be ordered from ROE)
- Standard clinical materials for luting sections together
- Designed specifically for fixed full arch restorations on multi-unit abutments
- Works best when the patient has an existing prosthetic that can be duplicated
- Not suitable for immediate load or cases without an established vertical dimension
- Standard compatibility: Nobel, BioHorizon, NeoDent, Biomet 3i, Hiossen, Thommen, Keystone
- OEM parts required: Zimmer, Implant Direct, Camlog, Astra, MIS, Straumann, Paltop
- Works with virtually all major implant platforms with appropriate components
- Standard systems use 3rd party scan analogs and fabrication components (lower cost)
- OEM systems require original equipment manufacturer parts for both scanning and fabrication (higher cost)
- Both deliver the same clinical results, the difference is in component sourcing and pricing
- iJIG scan analogs are system-specific and cannot be substituted
- Wrong analogs will result in a poor fit and inaccurate records
- Mixed implant cases require the identification of each implant position
- Exact implant system for each position
- Clear notation that this is an "iJIG case"
- For mixed systems, specify which implant is at each location
- Any special requirements or modifications needed
- Event 1: Remove prosthetic, scan tissue, and MUAs only (no scan bodies)
- Event 2: Attach iJIG scan analogs to prosthetic, scan 360 degrees extraorally
- Event 3: Remove analogs, reseat prosthetic, scan opposing, and bite registration
- Clean temporary cylinders thoroughly before attaching scan analogs
- Scan one analog at a time when possible to avoid confusion
- Ensure complete 360-degree capture of prosthetic with no missed areas
- Take a broad bite registration for better manual alignment if needed
- Yes, iJIG works with all major IOS systems, including CEREC, iTero, Trio, and others
- Some specific scanner limitations exist (we'll provide details for your system)
- The key requirement is the ability to scan prosthetic extraorally with attached analogs
- Contact ROE immediately for guidance on re-scanning protocols
- Most scanning issues can be resolved with technique adjustments
- We can provide real-time support for challenging cases
- Receive sectioned iJIG from the laboratory
- Seat each section individually and verify passivity
- Use dental floss to ensure sections aren't contacting
- Lute sections together with appropriate material (Stellar, GC Pattern Resin, etc.)
- Equilibrate occlusion and capture bite registration
- Take a reline impression if tissue adaptation needs improvement
- Typically 45-60 minutes for seating, luting, and equilibration
- Additional time if significant adjustments are needed
- Less time than traditional verification appointments due to pre-established VDO
- Remove individual sections for adjustment
- Modify sections to eliminate contact points
- Ensure MUAs are properly torqued before re-seating
- Contact ROE for guidance if significant modifications are needed
- Yes, by creating an analog model during initial scanning
- Place prosthetic with analogs in stone model and ship to ROE
- We'll fabricate a printed try-in instead of a sectioned iJIG
- This option saves one appointment but requires chairside model-making
- Stellar dual-cure resin (our preferred choice for fast setting)
- GC Pattern Resin or Duralay (alternative options)
- Any near-zero shrinkage material suitable for intraoral use
- Avoid materials with high shrinkage that could affect fit
- Reduces full arch cases from 7+ appointments to as few as 3
- Eliminates the need for custom trays, verification jigs, and multiple try-ins
- Provides a functional prototype for patient test-drive and approval
- Streamlines record transfer with comprehensive digital capture
- Precise implant positions through digital scanning
- Established vertical dimension from the existing prosthetic
- Tissue contours through reline impression
- Occlusal relationships through bite registration
- Patient-approved tooth position and aesthetics
- Yes, if iJIG fits perfectly and the patient approves all aspects
- Many experienced doctors skip the printed try-in stage
- Depends on case complexity and your comfort level
- Printed try-in is always available as an additional verification step
- Digital duplication maintains proven vertical dimension
- Sectioned design verifies passive fit before commitment
- Comprehensive record capture eliminates guesswork
- Patient test-drives actual tooth positions and bite relationships
- Detailed scanning protocols and video tutorials
- Real-time technical support during appointments
- Troubleshooting guidance for challenging cases
- Online videos detailing workflow steps
Downloadable Resources and Workflows
Video Resources
iJig: Seatings Workflow
iJig: Records Workflow
iJIG Patient Records
How to scan for an iJIG
iJIG Seating Appointment
iJIG + Records for Fabrication
iJIG Workflow
Workflow Steps | Instructions | Images |
---|---|---|
Step 1 | Take the following photos with the patient standing up:
|
![]() |
Step 2 | Remove the patient’s prosthesis. Seat scan analogs passively onto the intaglio side of each of the temporary cylinders of the prosthesis. | ![]() |
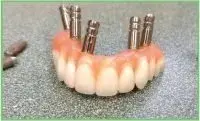
Step 3 | Scan the tissue and MUAs with your IOS. No scan bodies or healing collars should be seated on the MUAs. | ![]() |
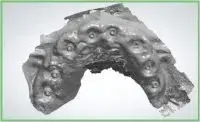
Step 4 | Capture a 360° extraoral scan of the prosthesis with the IOS. Be sure to capture each scan analog and verify that there are no missed holes in the scan. |
![]() |
Step 5 | Reseat. Capture the following IOS scans:
|
![]() |
Creating the Master Cast - optional, but recommended: The doctor may choose to create a Master Cast of the loaded prosthesis. The benefit of creating the Master Cast is that the doctor can skip an additional appointment (see steps 9-16) and go straight to the Printed Try-In. To create a Master Cast, follow steps 6-7. If you are not creating a Master Cast, go directly to step 8. |
|
|
Step 6 | Acquire a flask, denture cup, or any container that can hold casting stone. Mix and pour casting stone into the flask. | ![]() |
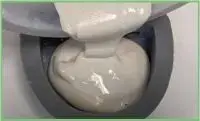
Step 7 | Set the prosthesis down in the stone. Ensure it is filled to the length of the analogs. It is important to ensure that the intaglio of the prosthesis is sitting a little bit above, not touching, the stone. Let the stone set up and become completely hard. | ![]() |
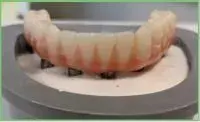
Step 8 | Send all records to ROE Dental Laboratory. If a Master Cast was created in steps 6-7, ROE will fabricate or provide in-office printing files for Printed Try-In. The Printed Try-In is a 3D-printed prototype of the final prosthesis. See page 58 for more details. If a Master Cast was NOT created in steps 6-7, follow steps 9-16. |
![]() |
iJIG to Printed Try-In: Follow steps 9-16 if a Master Cast was NOT created in steps 6-7. | |
|
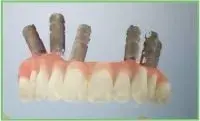
Step 9 | ROE fabricates and ships the iJIG. | ![]() |
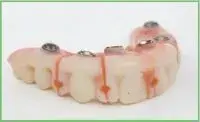
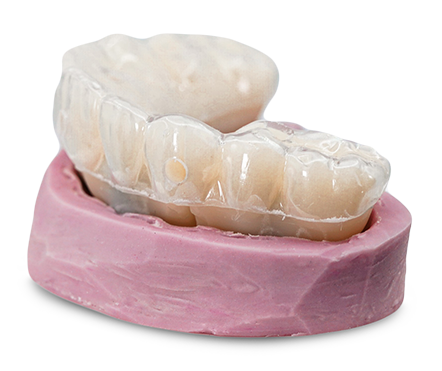
Step 10 | Add tray adhesive to the tissue side of each section of the iJIG. Screw down each section using the clear, suckdown transfer holder. Ensure all sections are fully seated and passive, and not touching each other. Capture an x-ray to confirm. Adjust for passivity if needed. | ![]() |
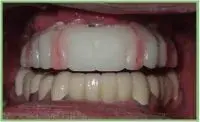
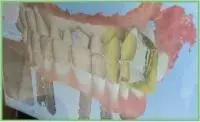
Step 11 | Lute all sections with acrylic resin (e.g. Stellar, GC Pattern Resin, etc.) and cure. | ![]() |
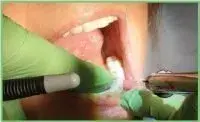
Step 12 | Equilibrate. Check VDO for speech issues. Capture the following PVS impressions:
|
![]() |
Step 13 | Take the following photos with the patient standing up:
|
![]() |
Step 14 | Make marks on the iJIG where esthetic changes are to be made. Add composite to simulate esthetics and adjust. | ![]() |
Step 15 | Flow medium or heavy body PVS between the iJIG and the tissue. | ![]() |
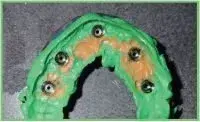
Step 16 | Send all records to ROE Dental Laboratory. Next, ROE will fabricate or provide in-office printing files for the Printed Try-In. The Printed Try-In is a 3D-printed prototype of the final prosthesis. See page 58 for more details. If patient and doctor are comfortable with the iJIG as the final prototype, you may choose to skip the Printed Try-In and order the final zirconia. |
![]() |
How can we help you today?
Can't find what you're looking for? No problem. Let us help.
ROE’s experts are dedicated to elevating your dental practice.
- Full-service national dental laboratory
- Comprehensive Certified Dental Laboratory (CDL) services
- Case planning support from 20+ Certified Dental Technicians
- Specialists in both fixed, removable, implant and full-arch dentistry
- Tailored support for all cases, from routine to complex
- National Association of Dental Laboratories (NADL) member
- Only FDA-approved materials used
- All products made in the USA
- Thousands of free online education materials