Overview
Taking traditional impressions for crowns involves using a flexible impression material, such as rubber base, to create a detailed mold of the patient’s prepared tooth and surrounding area. The dentist first places a tray filled with the impression material over the prepared tooth and nearby teeth, ensuring it covers the entire area to capture all necessary details. The material is left to set for a few minutes until it hardens, then the tray is carefully removed, leaving a negative impression of the tooth. Alginate should not be used for crown work due to several limitations: it’s more sensitive than rubber-based materials, has poor setting time characteristics, and doesn’t flow well into small areas around the tooth preparation.
Technology & Materials
- Hemostatic agent
- Cord (sizes #00 and #02)
- Compressed air
- Light-body PVS material
- Heavy-body PVS material
- Impression tray
- Optional: aluminum chloride
Workflow Steps for a Crown Fabricated By Lab
| Step | Instructions | Image |
| 1. |
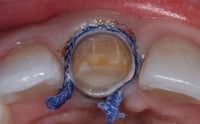
Apply hemostatic agent to limit bleeding and moisture. Implement a two-cord retraction technique by first packing smaller cord into the crevice, then packing larger cord (#02) on top. Wait 3-5 minutes for the hemostatic effect to take place. Optional: Place aluminum chloride-soaked cotton strip over the first cord for extra moisture control. |
 |
| 2 |
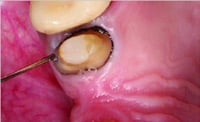
Re-wet the larger cord and remove only the larger cord while leaving the smaller cord in place for impression. Wetting the larger cord before removal helps prevent tissue damage during extraction. |
 |
| 3. | Thoroughly dry the preparation site and use compressed air to remove all moisture. Ensure that the sulcus is completely dry and that the margins are clearly visible. |  |
| 4. |
Apply a thin rope of light body impression material into the sulcus. Application tips:
|

|
| 5. |
While the light body impression is still setting, fill the tray generously with heavy body impression material to ensure full coverage. Use the same brand as the light body material. Application tips:
|

|
| 6. |
Remove the impression in one smooth motion by pulling in the direction of tooth axis. Inspect for voids, tears, or pulls and verify margin clarity. |

|
| 7. |
Optional: For minor imperfections, mix a small amount of the remaining impression material and use the explorer to place the material in voids. Build up thin areas as needed and allow to set completely. |

|
| 8. |
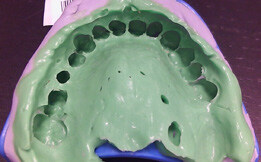
Verify the impression is of sufficient quality and send to ROE. Quality control checklist: ✔️Margins are clearly captured ✔️No voids or bubbles present ✔️No tears or pulls in material ✔️Adequate thickness of material ✔️Clear impression of opposing arch ✔️Proper occlusal registration |

|
|
Important: For proper occlusal registration, avoid using too much bite material, which can prevent doctors from verifying correct occlusion. Use just a single rope of bite material applied to the occlusal surfaces with a large syringe, then have the patient bite into it. This allows you to check that teeth are in proper occlusion while the bite material is setting. If you’re working on a case that doesn’t have adequate centric stops, consider using bite rims or a full-arch impression to capture whatever centric stops are available. If you’re uncertain about a bite registration and concerned it might be mounted incorrectly, have it mounted in the lab and check it before fabrication proceeds so that both you and the lab know it’s correct. |
||