
Overview
A single crown fabricated by a dental lab involves a multi-step process where a dentist takes impressions of the affected tooth, which are then sent to a specialized dental laboratory. At the lab, skilled technicians create a custom crown that fits perfectly, matches the natural tooth color, and restores both function and appearance. This process typically takes a few days, and during this time, the patient may wear a temporary crown. Lab-fabricated crowns are highly durable, precise, and offer excellent esthetic results for long-term dental restoration.
Technology & Materials
- IOS scanner or PVS impression material
- X-Ray
- Adjustment burs/drills
- Crown cement
Workflow Steps for a Crown Fabricated By Lab
| Step | Instructions | Image |
|
First Appointment |
||
| 1. |
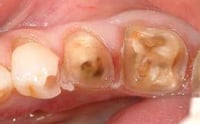
Clean and prepare the tooth by removing decay and damaged structure. Shape the remaining tooth structure to accommodate the crown. |
 |
| 2. | Build up core material if needed to create a stable foundation for the crown. |  |
| 3. | Shape the tooth with retention grooves and verify adequate occlusal clearance, then pack retention cord around the preparation. Ensure margins are clean and dry throughout the process. | 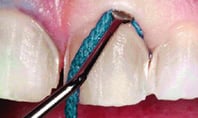 |
|
Important: The preparation shape is critical for providing stability and preventing the crown from moving or seating incorrectly - the geometry must allow the crown to seat in only one correct position. Clean, dry margins are essential because any blood or fluid around the margins during scanning can result in inaccurate digital impressions, leading to open or short margins in the final restoration. |
||
| 4. |
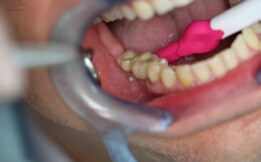
Capture detailed impressions through digital scanning or traditional methods, including bite registration. Full-arch scans provide optimal accuracy because, like analog impressions, they allow all teeth to come together in proper occlusion and give the best chance for correct bite registration. Single arch or quadrant scans also work effectively as long as the practitioner monitors the scanning process closely. |

|
|
Important: The doctor should verify every case to ensure the patient maintains correct bite position during scanning, especially with quadrant impressions, to achieve accurate occlusion. If any scans appear correct but look suspicious, note this in the instructions so the lab knows the practitioner has reviewed and approved proceeding with the case. |
||
| 5. |
Create and place temporary crown to protect the prepared tooth. |

|
| 6. | Select appropriate crown material and determine final shade specifications. Capture color photographs with shade tabs and include stump shade references for best results. | 
|
|
Important: Stump shades are critical for proper crown fabrication, as any discrepancy between the stump shade and desired crown shade can cause inaccurate shade matching. |
||
| Second Appointment | ||
| 1. | Remove temporary crown and clean temporary cement thoroughly from prepared tooth surface. |
|
| 2. | Immerse the crown in 0.12% chlorhexidine gluconate solution for 2 minutes to achieve proper sanitization before placement. | 
|
| 3. | Trial fit the final crown from the lab and check margins, contacts, occlusion, embrasure form, and overall esthetics before final cementation. Make any adjustments if necessary. Similar to during final seating, have the patient bite firmly on something to hold the crown in proper position and ensure the margins are fully seated and sealed. |  |
| 4. |
Before cementation, capture a post-operative x-ray to ensure margins are fully sealed. If you identify an open margin, determine whether the crown is not seating properly or if the crown margin is short of the tooth margin. This verification is particularly important in proximal areas where visual inspection is difficult - use an explorer to tactilely confirm proper marginal fit. Always ensure complete adaptation before proceeding with final cementation.. |

|
|
Important: Cement volume control is critical when cementing crowns. Studies show dentists routinely use 20 times more cement than needed, resulting in 95% extrusion beyond margins. Excessive cement expression creates significant risks: improper cleaning around margins becomes difficult, and margin visibility is compromised during the procedure. For implant crowns, this problem is particularly serious since margins are often subgingival, making excess cement removal nearly impossible. This retained cement acts as a bacterial reservoir, significantly increasing peri-implantitis risk and potential implant failure. Best practices require applying only a thin film of cement inside the crown - just enough to create adequate retention while preventing marginal extrusion. Careful cement control and thorough removal protocol are essential for optimal retention, proper margin visualization, and long-term restoration success. |
||
| 5. |
Apply a thin layer of cement along the internal walls of the crown, avoiding excess particularly near the margins. Seat the crown firmly onto the tooth by placing it under finger pressure, having the patient bite down, then positioning a wood stick between the occlusion to hold the crown in place as the cement sets. |
 |
| 6. | Remove excess cement while still in the rubbery stage, using floss and scalers to ensure complete cleanup subgingivally and around all margins. | 
|
| 7. | Check and adjust proximal contacts, emergence profile, and occlusal contacts in both centric and excursive movements using articulating paper. | 
|
| 8. | Polish all adjusted surfaces thoroughly, as this step is critical - rough, unpolished contacts can wear away adjacent natural teeth and create spacing, while rough occlusal surfaces can abrade opposing natural teeth over time. |  |
Additional Resources
For more information concerning Crown & Bridge Solutions:
- Fixed Restorations Product Page
- Crown & Bridge Solutions - Your Guide to ROE's Fixed Restorations
- More Crown & Bridge Workflow's
Contact Information
For help with Crown & Bridge Solution's for your next case, contact ROE Dental Laboratory:
- Phone: (216) 663-2233
- Email: info@roedentallab.com